A custom flannel program looks simple next to a full uniform rollout: pick a plaid, add a logo, choose a size run, done. Then the boxes arrive, half the crew says the shirts run big, the cotton ones tighten up after the first wash, and the embroidered logo disappears into the pattern from six feet away. None of those outcomes are bad luck. They are the predictable result of a handful of decisions made too fast at the order stage. Here are the ones that most often go wrong on a custom flannel order, and what to do instead.
Ordering by label size instead of measured chest
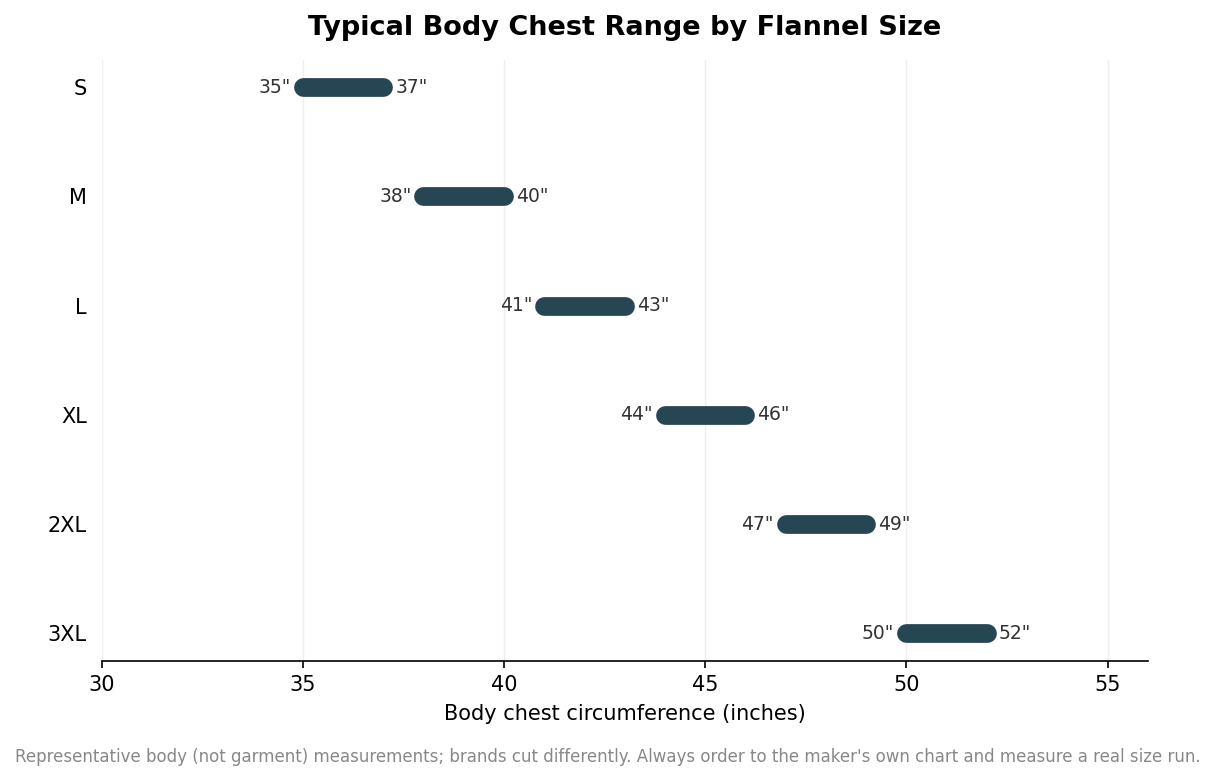
The single most expensive assumption is that a medium is a medium. Flannel is cut by brand and by fit block, and the same person can wear three different labeled sizes across three makers. A body chest of 40 inches lands in a medium on one chart and a large on another, and layering intentions push it further. The fix costs an afternoon: collect an actual chest measurement for each wearer, or at minimum pass a full physical size run around the team and let people self-select against real garments. Then order to the maker’s own chart, not to a generic assumption about what each letter means. It helps to remember that a printed chart usually lists body measurements, the person, while a tech pack lists garment measurements, the shirt laid flat, and the gap between them is the ease built into the fit. Confusing the two is how an order ends up uniformly a size too tight or too loose across the whole team.
Ignoring how much cotton flannel shrinks
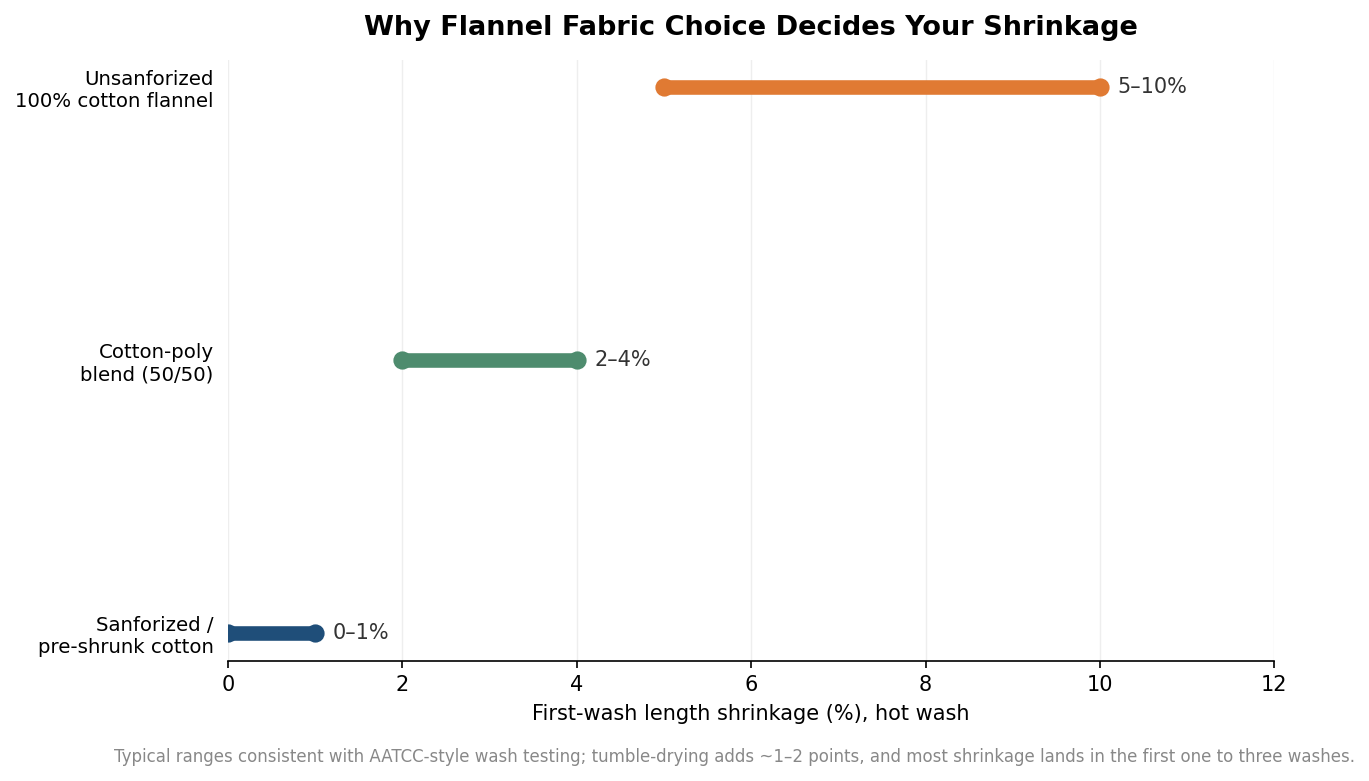
Flannel’s warmth comes from a brushed cotton nap, and untreated cotton moves in the wash. In AATCC-style testing, an unsanforized 100 percent cotton woven can lose roughly 5 to 10 percent of its length on a first hot wash, with most of the total change happening in the first one to three launderings and tumble-drying adding another point or two. A shirt that fit at delivery can come back a size shorter in the body and sleeves. There are two clean ways around it. Specify a sanforized or pre-shrunk fabric, which holds residual shrinkage to about one percent on a woven, or choose a cotton-polyester blend, which typically settles in the 2 to 4 percent range because the polyester stabilizes the cloth. If you must run untreated cotton for the hand-feel, size up deliberately and tell wearers to wash cold and dry low.
Picking the wrong fit block for how it gets worn
Fit is not just slim versus regular; it is a decision about what goes underneath. A slim or tailored block looks sharp on a host or a retail floor but fights a hoodie or a base layer. A classic cut suits most mixed teams. A relaxed or jacket block is the right call when outdoor staff will wear the flannel as an overshirt across a tee and a sweatshirt through a cold shift. Sleeve and body length matter as much as chest here, because a flannel worn open as a layer needs enough length to stay tucked or to sit right untucked. Decide the wear scenario first, then pick the block that serves it, rather than defaulting to whatever the blank supplier lists first. A useful test is to try the sample over the thickest layer your team will actually wear underneath; if the buttons strain or the shoulders bind with that layer on, the block is wrong regardless of what the chest number says.
Decorating over the plaid without planning for it
A plaid is a busy, multi-color background, and it does to a logo exactly what camouflage does to a shape. Fine embroidery detail and thin screen-printed lines get swallowed by the check, and thread colors that pop on a solid can vanish on a dark tartan. The practical moves are to keep the decoration bold and simple, to place it on the calmest available real estate such as a solid yoke, a pocket, or a sleeve panel, and to consider a woven or leather-style patch that gives the mark its own clean field instead of fighting the pattern. Whatever the method, approve a stitch-out or a printed proof on the actual plaid you ordered, not on a white mockup, because legibility is a property of the combination, not the logo alone.
Skipping the pre-production sample and the buffer
The last mistake is treating the first production run as the proof. On a custom apparel order, the sample stage is where you catch the shrinkage, the fit block, and the decoration legibility all at once, while changes are still cheap. Ask for a physical pre-production sample in your exact fabric and decoration, wash it, and only then release the bulk quantity. Build a modest buffer into the size run as well, because the tails of the curve, the extra 3XL and the occasional small, are the sizes you cannot easily add later without a second setup charge. Where a supplier quotes minimums, lead times, or price breaks, treat those as indicative until fabric, decoration, and the full size split are locked, since each of those still moves the number. Get the sample right and the rest of the order stops being a gamble, because every variable that could have surprised you has already been settled on a shirt you can hold. That is the difference between a program the team actually wears and a closet full of returns.